MugZee Raid Guide
- The Prefessional
- Apr 6, 2025
- 7 min read

Updated: May 14, 2025
Welcome to the Ultimate MugZee Raid Guide! This guide includes information for LFR and Normal difficulties. Simply click on your chosen difficulty to access all the details you need. We've also included color codes to highlight important points for Healers, Tanks, and DPS.
Video Guide
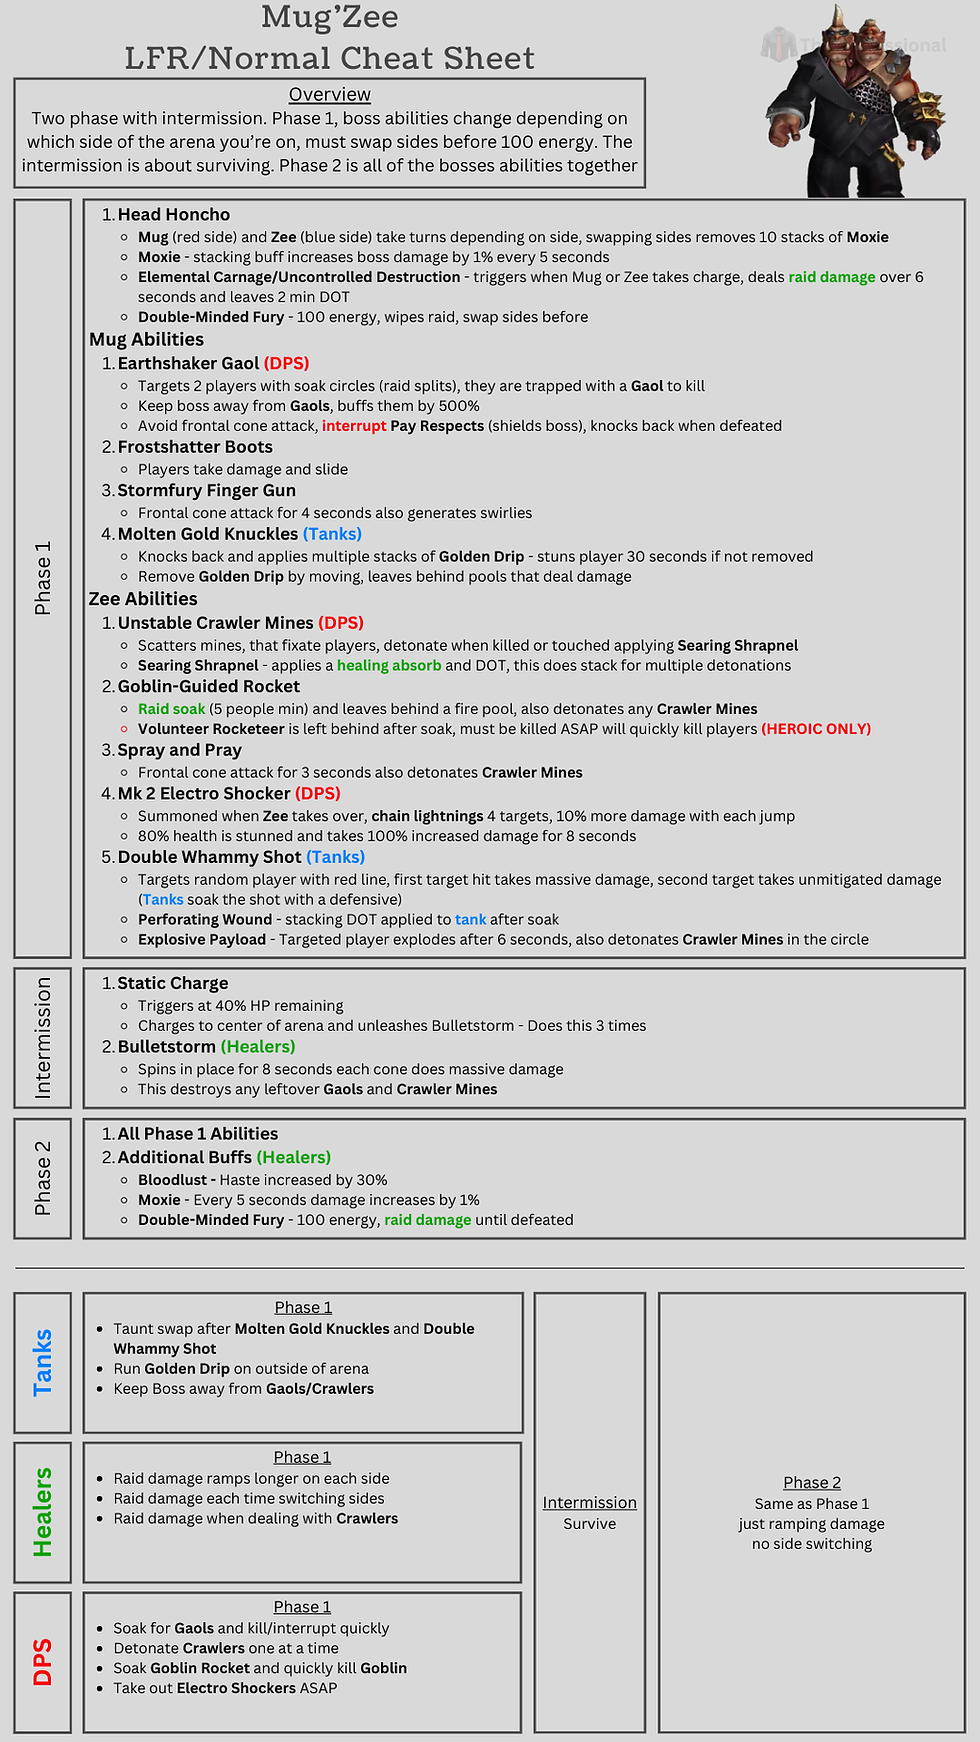
Cheat Sheet
MugZee Raid Guide
Encounter Overview
The Mug'Zee fight is a two phase fight with a brief intermission between them. Phase 1 consists of moving between the two sides of the arena, each side has differing mechanics. The Intermission is about surviving. Phase 2 is a combination of all of Phase 1's abilities however it doesn't matter which side you are on and it's a DPS race.
Phase 1
Normal
Setup
The arena is split in the middle. The left side is Zee, the right side is Mug.
Each side has it's own specific mechanics and the side you're dealing with depends on where the raid is, not the boss. Meaning once most of the raid is on one side or the other it triggers those mechanics.
You should alternate sides before the boss reaches 100 energy.
There should be 2 groups designated for a soak mechanic on Mug side.
The boss gains stacks of Moxie every 5 seconds, increasing damage done by 1%. You remove 10 stacks of this when you switch sides.
Zee Mechanics
Uncontrolled Destruction
When Zee takes over, deals raid damage over 6 seconds and applies a debuf that ticks damage every half second. This stacks and lasts the entire fight.
MK 2 Electro Shocker
Two of these spawn, 1 to the North and 1 to the South. Quickly kill them as they chain lightning random targets. They are stunned and take double damage for 8 seconds when at 80% HP.
Unstable Crawler Mines
These spawn and fixate players, slowly pursuing them.
When they explode they deal raid damage and apply a healing absorb that needs to be cleared.
Players should stagger their detonation. The boss also detonates them if his abilities hit them.
Goblin Guided Rocket
A large soak circle targeted on one person. This leaves behind a fire ground effect so the player should run this to the wall.
Double Whammy
Targets a random player with a line. The tank should stand in the line between this player and the boss to absorb the shot. Damage is based on tanks mitigation.
The tank suffers a 45 second DOT and targeted player gets a large ring on them that explodes after 6 seconds.
Spray and Pray
Targets a random player and tracks them. Deals damage in a frontal cone.
Mug Mechanics
Elemental Carnage
When Mug takes over, deals raid damage over 6 seconds and applies a debuf that ticks damage every half second. This stacks and lasts the entire fight.
Earthshaker Gaol
Targets 2 players with a soak. Players inside this soak are trapped in a prison with an Elemental and must kill the elemental to break free.
Interrupt the Elementals Pay Respects or the boss is shielded.
Elemental does an avoidable frontal cone attack.
Do not overlap soaks and keep the boss away or they enrage - 500% damage.
Molten Gold Knuckles
Targets the tank with a frontal cone attack knocking them backwards and applying a debuf called Golden Drip.
Golden Drip starts at 30 stacks and as you move your stacks decrease. At the same time you leave behind gold on the ground. Run along the outside wall until this debuff is removed. If not removed you're stunned for 30 seconds.
Frostshatter Boots
Targets random players with a blue ring. You slide around, stay away from others.
Stormfury Finger Gun
Targets a random player and tracks them. Deals damage in a frontal cone.
Role Specific Duties
Tanks
Don't let the boss reach 100 energy.
Taunt swap after Double Whammy Shot and Molten Gold Knuckles.
Run Golden Drip along the wall.
Keep boss away from the Gaols and Crawlers.
Healers
Raid damage ramps the longer you stay on one side
Expect raid damage over 6 seconds when switching sides.
Expect constant healing absorbs with Crawler Mine detonations.
DPS
Quickly burn down the Electro towers.
Soak Goblin Rocket near the wall.
Stagger detonating the Crawler Mines.
Soak for Gaols and interrupt/kill them quickly.
LFR
Setup
The arena is split in the middle. The left side is Zee, the right side is Mug.
Each side has it's own specific mechanics and the side you're dealing with depends on where the raid is, not the boss. Meaning once most of the raid is on one side or the other it triggers those mechanics.
You should alternate sides before the boss reaches 100 energy.
There should be 1 group designated for a soak mechanic on Mug side.
The boss gains stacks of Moxie every 5 seconds, increasing damage done by 1%. You remove 10 stacks of this when you switch sides.
Zee Mechanics
Uncontrolled Destruction
When Zee takes over, deals raid damage over 6 seconds and applies a debuf that ticks damage every half second. This stacks and lasts the entire fight.
MK 2 Electro Shocker
Two of these spawn, 1 to the North and 1 to the South. Quickly kill them as they chain lightning random targets. They are stunned and take double damage for 8 seconds when at 80% HP.
Unstable Crawler Mines
These spawn and fixate players, slowly pursuing them.
When they explode they deal raid damage and apply a healing absorb that needs to be cleared.
Players should stagger their detonation. The boss also detonates them if his abilities hit them.
Goblin Guided Rocket
A large soak circle targeted on one person. This leaves behind a fire ground effect so the player should run this to the wall.
Double Whammy
Targets a random player with a line. The tank should stand in the line between this player and the boss to absorb the shot. Damage is based on tanks mitigation.
The tank suffers a 45 second DOT and targeted player gets a large ring on them that explodes after 6 seconds.
Spray and Pray
Targets a random player and tracks them. Deals damage in a frontal cone.
Mug Mechanics
Elemental Carnage
When Mug takes over, deals raid damage over 6 seconds and applies a debuf that ticks damage every half second. This stacks and lasts the entire fight.
Earthshaker Gaol
Targets 1 player with a soak. Players inside this soak are trapped in a prison with an Elemental and must kill the elemental to break free.
Interrupt the Elementals Pay Respects or the boss is shielded.
Elemental does an avoidable frontal cone attack.
Keep the boss away or the Elemental enrages - 500% damage.
Molten Gold Knuckles
Targets the tank with a frontal cone attack knocking them backwards and applying a debuf called Golden Drip.
Golden Drip starts at 30 stacks and as you move your stacks decrease. At the same time you leave behind gold on the ground. Run along the outside wall until this debuff is removed. If not removed you're stunned for 30 seconds.
Frostshatter Boots
Targets random players with a blue ring. You slide around, stay away from others.
Stormfury Finger Gun
Targets a random player and tracks them. Deals damage in a frontal cone.
Role Specific Duties
Tanks
Don't let the boss reach 100 energy.
Taunt swap after Double Whammy Shot and Molten Gold Knuckles.
Run Golden Drip along the wall.
Keep boss away from the Gaols and Crawlers.
Healers
Raid damage ramps the longer you stay on one side
Expect raid damage over 6 seconds when switching sides.
Expect constant healing absorbs with Crawler Mine detonations.
DPS
Quickly burn down the Electro towers.
Soak Goblin Rocket near the wall.
Stagger detonating the Crawler Mines.
Soak for the Gaol and interrupt/kill it quickly.
Intermission - 40% HP
Normal
Overview
This triggers at 40% hp. The boss will mark a spot and charge there, once stopping he spins around in a circle dealing heavy damage to anyone in his line of fire. Rotate with the boss staying away from his hands and avoiding the smaller circles as you'll be periodically stunned. He charges 3 times before starting Phase 2.
Role Specific Duties
Tanks
Rotate and chill.
Healers
Expect pulsing raid damage with the debuffs still ticking.
DPS
Stay on the boss and rotate with him.
LFR
Overview
This triggers at 40% hp. The boss will mark a spot and charge there, once stopping he spins around in a circle dealing heavy damage to anyone in his line of fire. Rotate with the boss staying away from his hands and avoiding the smaller circles as you'll be periodically stunned. He charges 3 times before starting Phase 2.
Role Specific Duties
Tanks
Rotate and chill.
Healers
Expect pulsing raid damage with the debuffs still ticking.
DPS
Stay on the boss and rotate with him.
Phase 2
Normal
Overview
After the intermission the boss pops Bloodlust, which is a great time for you to do as well. This becomes a DPS race to kill the boss before he reaches 100 energy otherwise he wipes the raid. You'll be dealing with every mechanic from Phase 1 except now it no longer matters where the boss or raid is positioned. So constantly be moving to clear areas of the arena.
Role Specific Duties
Tanks
Be aware of your positioning and keep the boss in the clear when possible.
Taunt swap after Double Whammy Shot and Molten Gold Knuckles.
Run Golden Drip along the wall.
Keep boss away from the Gaols and Crawlers.
Healers
Raid damage continues to ramp.
Expect constant healing absorbs with Crawler Mine detonations.
DPS
Quickly burn down the Electro towers.
Soak Goblin Rocket near the wall.
Stagger detonating the Crawler Mines.
Soak for Gaols and interrupt/kill them quickly.
Constantly rotate through your defensives.
LFR
Overview
After the intermission the boss pops Bloodlust, which is a great time for you to do as well. This becomes a DPS race to kill the boss before he reaches 100 energy otherwise he wipes the raid. You'll be dealing with every mechanic from Phase 1 except now it no longer matters where the boss or raid is positioned. So constantly be moving to clear areas of the arena.
Role Specific Duties
Tanks
Be aware of your positioning and keep the boss in the clear when possible.
Taunt swap after Double Whammy Shot and Molten Gold Knuckles.
Run Golden Drip along the wall.
Keep boss away from the Gaol and Crawlers.
Healers
Raid damage continues to ramp.
Expect constant healing absorbs with Crawler Mine detonations.
DPS
Quickly burn down the Electro towers.
Soak Goblin Rocket near the wall.
Stagger detonating the Crawler Mines.
Soak for the Gaol and interrupt/kill it quickly.
Constantly rotate through your defensives.
Final Tips
During Phase 1 make sure you're switching before 100 energy!
This is mechanic intensive, DPS doesn't matter until Phase 3!
Phase 3 is chaos, just accept that and Bloodlust!
Comments